
Mini Cheesecakes
Perfectly Bite-Sized Delights
INTRODUCTION
Imagine a cozy gathering with friends where the air is filled with laughter and the sweet scent of freshly baked treats. These mini cheesecakes bring joy and nostalgia to every occasion, making them a beloved choice for gatherings. Crafted with care, they offer all the creamy goodness of a traditional cheesecake in a perfectly portioned bite. Each mini cheesecake is a slice of happiness, designed to create comforting memories around the table. With simple ingredients and steps, creating these delightful desserts becomes an enjoyable experience everyone can share.
Quick Recipe Overview
- Prep Time: 20 minutes
- Cook Time: 20 minutes
- Total Time: 2 hours 40 minutes (including chilling)
- Servings: 12 mini cheesecakes
- Difficulty: Easy
- Cuisine: American
- Best Season: Year-round
Reasons to Adore This Recipe
- Irresistible Flavor: Each mini cheesecake boasts a rich and creamy texture, enhanced by a hint of vanilla and a splash of lemon juice for brightness. Topped with fresh berries or whipped cream, they become an elegant treat bursting with flavor.
- Effortless Preparation: This recipe is designed for simplicity, allowing anyone—regardless of kitchen experience—to whip up these delightful desserts. Clear steps ensure success from the first bite to the last.
- Versatile for Occasions: Whether it’s a birthday party, holiday celebration, or a casual dinner, these mini cheesecakes fit every event’s theme and vibe. Their charming portion size makes them perfect for sharing among friends and family.
- Make-Ahead Option: With a chilling time of up to 24 hours, these mini cheesecakes can be prepared ahead, allowing you to enjoy your time with guests. Just prepare, chill, and serve, making entertaining stress-free.
- Customizable Toppings: Feel free to personalize these mini cheesecakes with your favorite toppings. From fresh fruits to chocolate ganache, the possibilities are endless, inviting creativity into your culinary creation.
Essential Ingredients for Mini Cheesecakes
- 1 cup (120g) graham cracker crumbs (about 8 full sheet graham crackers)
- 2 Tablespoons (25g) granulated sugar
- 3 Tablespoons (43g) unsalted butter, melted
- 16 ounces (452g) full-fat brick cream cheese, softened to room temperature
- 1/2 cup (100g) granulated sugar
- 1/4 cup (60g) full-fat sour cream, at room temperature
- 1 teaspoon pure vanilla extract
- 1 teaspoon freshly squeezed lemon juice
- 2 large eggs, at room temperature
Ingredient Insights
- Graham Cracker Crumbs: Ideal for a crumbly crust, ensuring a solid base while giving a delightful texture. Consider using gluten-free alternatives to cater to dietary needs.
- Unsalted Butter: Melted butter helps bind the crumbs together while adding a rich flavor. Always use unsalted to control the salt level in the recipe.
- Full-Fat Cream Cheese: It provides the creaminess that makes cheesecakes truly divine. Softer cream cheese at room temperature ensures a smooth batter without lumps.
- Granulated Sugar: Balances the richness of the cheesecake, enhancing its sweetness without overpowering the other flavors.
- Sour Cream: Adds tanginess and creaminess to the mixture, balancing the flavors brilliantly. Consider substituting with Greek yogurt for a lighter version.
Step-by-Step Guide to Create Mini Cheesecakes
- Preheat oven to 350°F (177°C). Line a standard 12-count muffin pan with cupcake liners.
- Combine all of the crust ingredients in a medium bowl. Mixture will be sandy. Firmly press a heaping Tablespoon of crust mixture into each liner. Bake the crusts for 6 minutes.
- Using a handheld or stand mixer fitted with a paddle or whisk attachment, beat the cream cheese and granulated sugar together on medium-high speed in a large bowl until the mixture is completely smooth and creamy, about 2 minutes.
- Add the sour cream, lemon juice, and vanilla extract, and beat until fully combined.
- With the mixer running on medium speed, add the eggs one at a time, beating just until combined before adding the next. Do not over-mix.
- Divide the batter among the liners, filling each all the way to the top. (It’s OK if the crust is still warm.)
- Optional Water Bath (prevents cheesecakes from excess sinking; skip this step if desired): Boil a pot of water. You need 1 inch of water in your roasting pan for the water bath, so make sure you boil enough.
- Place a large metal baking or roasting pan on the bottom oven rack of the preheated oven. Pour boiling water into the pan, about 1 inch deep. Immediately place the cheesecakes on the center rack. Close the oven to trap the steam inside.
- Bake until the edges are set and the centers slightly jiggle when you tap the pan, about 20 minutes.
- Set the pan on a cooling rack and allow cheesecakes to cool at room temperature for 45 minutes, then transfer to the refrigerator and chill for at least 2 hours and up to 24 hours. (Or place in the freezer for 1 hour to speed things up.)
- If chilling in the refrigerator for longer than 2 hours, loosely cover the cheesecakes. Even if you used the water bath method, the cheesecakes will slightly sink as they cool.
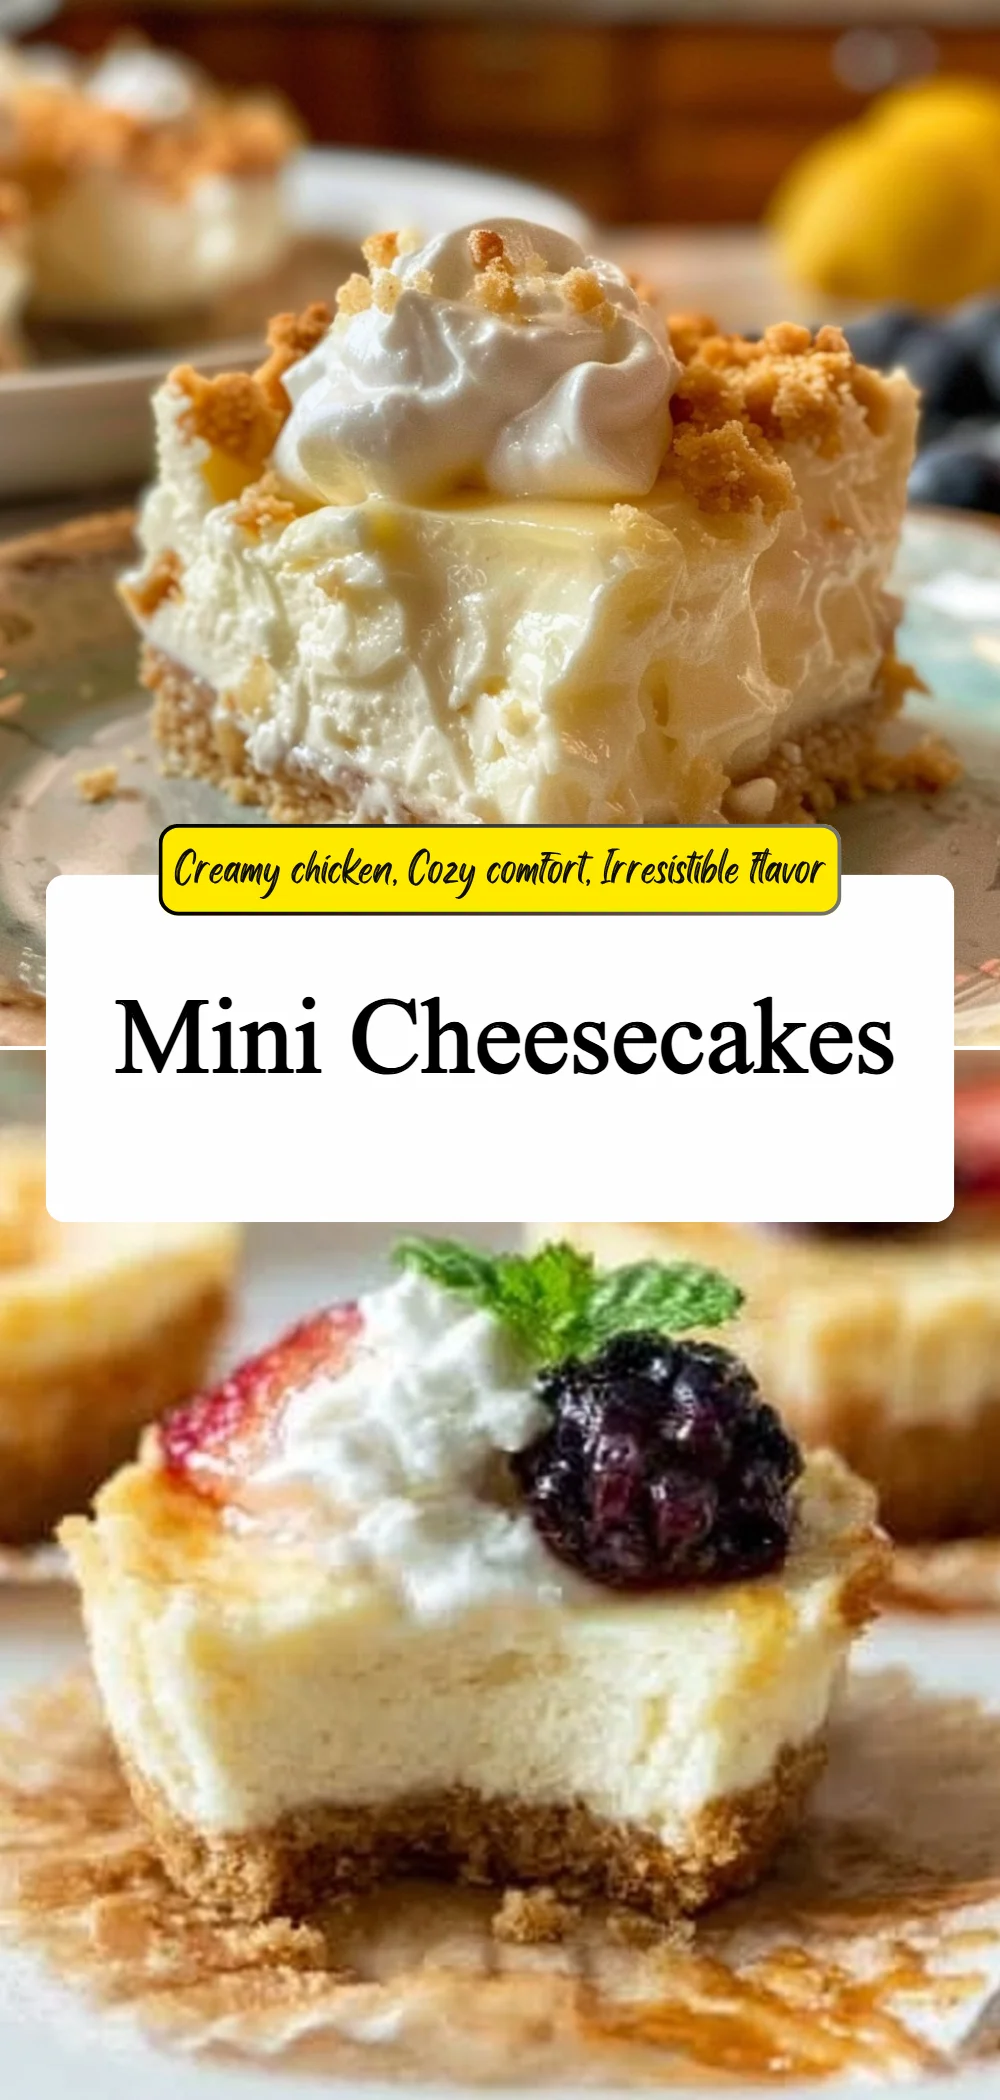
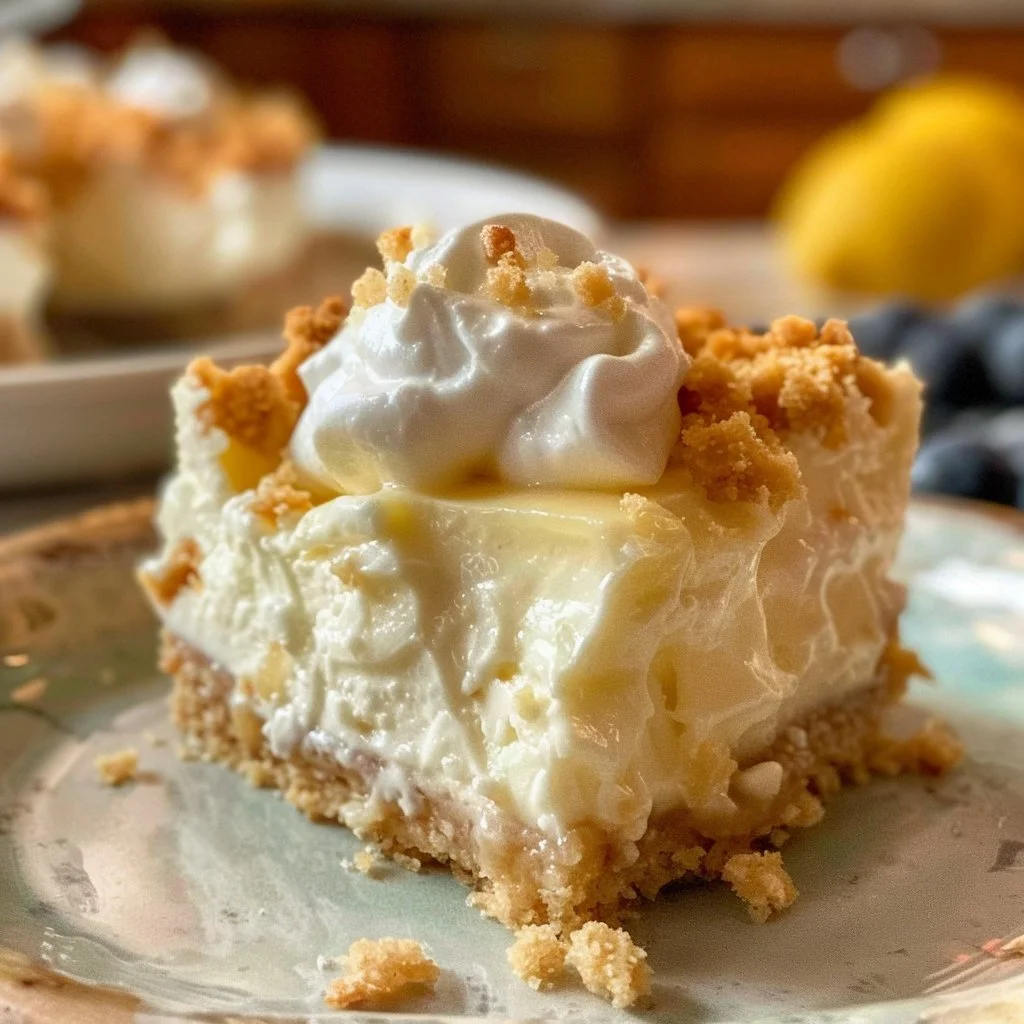
- I used a piping bag to create decorative whipped cream on the mini cheesecakes. Garnish with berries, mint, and/or other toppings as desired.
- Cover and store leftover cheesecakes in the refrigerator for up to 5 days.
Expert Tips for Perfect Results
- Technique Matters: Ensure cream cheese is at room temperature for the smoothest batter. This simple step helps prevent lumps that can ruin the texture of your cheesecakes.
- Timing is Key: Keep an eye on baking times; every oven bakes differently. Use the jiggle test to ensure your mini cheesecakes are just set.
- Flavor Infusions: Consider adding citrus zest or flavored extracts for an extra layer of taste. Natural ingredients will enhance the classic flavor profile beautifully.
- Presentation Counts: Whipped cream and fruit garnishes not only add flavor but also elevate the visual appeal of your mini cheesecakes. Creativity in plating can enhance the overall experience.
Exciting Variations to Try
- Vegan Delight: Replace cream cheese and sour cream with vegan cream cheese and coconut cream for a plant-based option. Use a flaxseed egg to bind the cheesecakes for a delicious dairy-free treat.
- Chocolate Cheesecake: Add melted dark chocolate to the batter for a rich chocolate variation. Top with chocolate shavings for an indulgent finish.
- Spicy Pumpkin: Incorporate pumpkin puree and pumpkin spice to create a seasonal favorite perfect for autumn celebrations. Top with a dollop of whipped cream and a sprinkle of cinnamon.
- Tropical Twist: Mix in coconut cream and top with pineapple for a refreshing tropical experience. This variation changes the flavor profile and makes for unique summer treats.
Perfect Pairings for Enjoyment
- Sides: Serve your mini cheesecakes alongside a fresh fruit salad for a burst of color and freshness. The fruity notes complement the richness of the cheesecake wonderfully.
- Drink: Pair with a light herbal tea or a refreshing lemonade to cleanse the palate. These beverages enhance the dessert experience without overpowering the flavors.
- Dessert Ideas: Complete your meal with a light, fruity sorbet for an additional sweet bite. This balance of textures and flavors creates a delightful finish.
Make-Ahead Strategies for Convenience
- Prep Ahead: Assemble the cheesecakes a day in advance, allowing the flavors to meld beautifully while chilling. This makes entertaining effortless and enjoyable.
- Storing: These mini cheesecakes can be kept in an airtight container in the refrigerator for fresh flavor over a few days. Ensure they are covered to maintain moisture.
- Freezing Tips: Mini cheesecakes freeze well. Wrap each one tightly in plastic wrap then aluminum foil to protect against freezer burn. Thaw in the refrigerator before serving.
- Reheating: While these desserts are best served cold, if you prefer them slightly warm, gently warm them in a microwave without the liner for just a few seconds.
Serving Strategies for a Special Touch
- Plating Ideas: Present each mini cheesecake on decorative plates for a sophisticated display. Adding fresh mint leaves can enhance the visual appeal and aroma.
- Presentation Vibes: Use beautiful serving platters for a buffet-style layout, inviting guests to indulge. A warm, cozy atmosphere encourages a shared experience.
- Creating Cozy Experiences: Arrange your serving areas with mood lighting and soft textures. Such details enhance the overall enjoyment of your mini cheesecakes and encourage relaxation.
Insider Secrets for Success
- Mixing Technique: Avoid over-mixing the batter to ensure a light texture. The creamy consistency should remain airy and fluffy for the best results.
- Temperature Control: Allow ingredients to come to room temperature before mixing for uniform baking. Cold cream cheese can lead to inconsistent texture.
- Water Bath Usage: Using a water bath contributes to the creaminess of the cheesecakes and prevents excess sinking. Although optional, it is a helpful technique for traditional cheesecake lovers.
- Consistency Checks: Make sure your cheesecakes are slightly jiggly in the center after baking. They will firm up as they cool, achieving that perfect creamy bite.
Storage Insights for Longevity
- Microwave Reheating: For leftovers, you can warm them gently in the microwave for a few seconds. However, avoid overheating to maintain texture.
- Stovetop Options: A double boiler can gently reheat cheesecakes if you prefer a more delicate approach. This helps preserve their creamy consistency.
- Texture Preservation: Always store in an airtight container to maintain freshness. This prevents them from absorbing odors in the refrigerator or freezer.
FAQ
Can I use low-fat cream cheese for mini cheesecakes?
Yes, low-fat cream cheese can be used, but the texture and creaminess may vary. Full-fat versions provide the richest flavor and texture.
How long do mini cheesecakes last in the fridge?
They can last up to 5 days in the refrigerator when stored in an airtight container. For optimal freshness, consume them within this period.
Can I make these mini cheesecakes gluten-free?
Absolutely! Substitute graham cracker crumbs with gluten-free alternatives for a delicious gluten-free version. Ensure other ingredients are also certified gluten-free.
How can I prevent the tops from cracking?
Avoid over-baking and use a water bath to maintain moisture in the oven. Removing from the oven while slightly jiggly helps prevent cracks as they cool.
Can I use a different sweetener?
Yes, you can substitute granulated sugar with alternatives like honey or maple syrup, adjusting the quantity to taste. Be mindful that this may affect the baking time slightly.
What toppings pair well with mini cheesecakes?
Fresh fruits, whipped cream, chocolate ganache, or a drizzle of caramel sauce are delightful options. Each topping adds a unique flavor complementing the rich cheesecake.
Nutrition Info
- Serving Size: 1 mini cheesecake
- Calories: 240
- Protein: 4g
- Carbs: 22g
- Fat: 16g
- Fiber: 0g
- Sugar: 8g
Nutrition facts are estimates and may vary.
Reflecting on Flavor and Community
Creating mini cheesecakes goes beyond just mixing ingredients; it’s about bringing people together, forming bonds over shared meals, and creating lasting memories. Each bite offers a taste of warmth and familiarity, reminding us of the joys of baking and the comfort of home. In various cultures, desserts hold sentimental value, making them key elements in celebrations and everyday life. These little treasures blend tradition with modern flavors, making each occasion special.
Final Thoughts
Mini cheesecakes are an exquisite dessert that invites joy and togetherness into any gathering. Whether you’re a baking novice or a seasoned chef, this recipe offers ease and delightful results. So gather your ingredients and cook these mini cheesecakes; share them with loved ones and spread the love on Pinterest as a treat everyone will adore. Together, let’s create comforting moments around the table!
Mini Cheesecakes
Ingredients
Method
- Preheat oven to 350°F (177°C). Line a standard 12-count muffin pan with cupcake liners.
- Combine all of the crust ingredients in a medium bowl. Mixture will be sandy. Firmly press a heaping Tablespoon of crust mixture into each liner. Bake the crusts for 6 minutes.
- Using a handheld or stand mixer fitted with a paddle or whisk attachment, beat the cream cheese and granulated sugar together on medium-high speed in a large bowl until the mixture is completely smooth and creamy, about 2 minutes.
- Add the sour cream, lemon juice, and vanilla extract, and beat until fully combined.
- With the mixer running on medium speed, add the eggs one at a time, beating just until combined before adding the next. Do not over-mix.
- Divide the batter among the liners, filling each all the way to the top. (It’s OK if the crust is still warm.)
- Optional Water Bath: Place a large metal baking or roasting pan on the bottom oven rack of the preheated oven. Pour boiling water into the pan, about 1 inch deep. Immediately place the cheesecakes on the center rack. Close the oven to trap the steam inside.
- Bake until the edges are set and the centers slightly jiggle when you tap the pan, about 20 minutes.
- Set the pan on a cooling rack and allow cheesecakes to cool at room temperature for 45 minutes, then transfer to the refrigerator and chill for at least 2 hours and up to 24 hours.
- Garnish with berries, mint, and/or other toppings as desired.